Snap Converter User Guide
1. Single Conversions
To convert single images, drag an image file to the Snap Converter window or to the application dock icon. Alternatively, you may use the File → Open... application menu option. Next, choose your conversion options and click the "Continue" button. From the next view, either drag the converted image from the Snap Converter window to a folder or use the "Save As..." button.
Note: You may drag a different image, folder, or multiple files onto the Snap Converter window to perform a new single or batch image conversion.
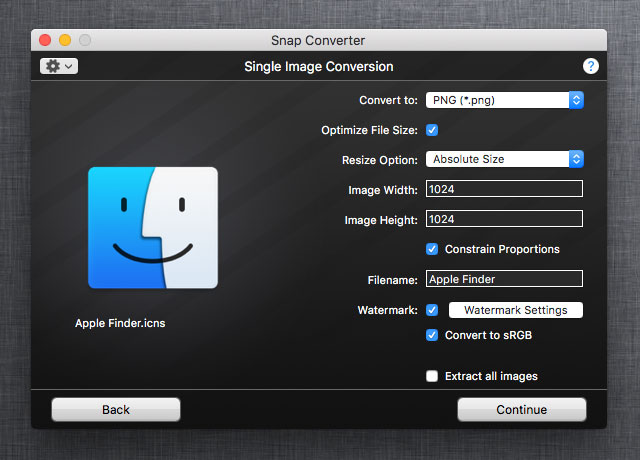 Single Image Conversion options
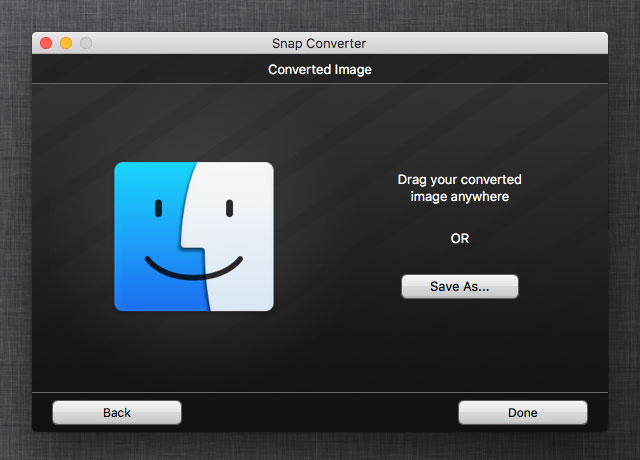 Converted Image view
General Options
| Convert to | The image type to convert to. |
| JPEG Quality | The quality of the output JPEG images. The higher the quality, the higher the file size. If you specify 100 as the quality, Snap Converter will use lossless compression. This option only displays when the "Convert to" option is set to JPEG. |
| Optimize File Size | Whether or not to use file size optimization for the output PNG image. This option can significantly reduce the output PNG image size without losing image quality. This option only displays when the "Convert to" option is set to PNG. Optimization will take longer to convert. NOTE: This process uses pngcrush technology and will strip color profile information. Therefore, if you want to retain color profiles, do not use this option. |
| Filename | The output filename for the converted image, excluding the file extension. |
| Preserve Metadata | Whether to preserve any image metadata (Exif, ExifAux, TIFF, GIF, JFIF, DNG, etc.). This option is only available for JPG and TIFF output. |
| Extract All | Whether you would like to extract all icon images from the icon file. This option only displays if an Mac icon file (*.icns) or Windows icon file (*.ico) is being converted. If selected, a separate image will be output for each image in the icon file.* Note that this option, as well as resizing options, are disabled if the "Convert to" type is *.icns. |
Resize Options
(Values are always in pixels unless specified otherwise.)
| None | No width or height adjustment (the converted image will have its original dimensions). The image width and height are displayed but are not editable. |
| Percentage | The image width and height are scaled by the percentage specified by the sliding bar. Decimal points are rounded to the nearest integer. The target image width and height (in pixels) are displayed as you change the percentage. |
| Longest Side | Maintains the image aspect ratio but makes sure that the image width and height are not longer than the value specified in the Longest Side field. Images are never enlarged unless the Enlarge smaller images option is checked. If the Longest Side value is blank, the image is not resized. |
| Absolute Size | Resizes the image to whatever width and height are specified. If Constrain Proportions is checked, the width and height change with each other as you edit the fields so that the image aspect ratio is maintained. If you uncheck Constrain Proportions and recheck it again, it resets the original image width and height. If you leave width blank, the original image's width is used (likewise for height). |
| Fixed Width or Height | Sets either the width or height to the specified length and rescales the other dimension by the image's aspect ratio. Images may be shrunk or expanded depending on the value entered. The image is not resized if the value is left blank. |
| Max Width and Height | Ensures that the resulting width is not larger than Max Width and the resulting height is not larger than Max Height. The image aspect ratio is maintained. If Max Width is left blank, the image's original width is used (same for Max Height). |
2. Batch Conversions
To convert images in batch, first drag a folder or one or more files from any location to the Snap Converter window or to the application dock icon. Alternatively, you may use the File -> Open... application menu option to choose a folder or multiple files. Once a folder or files have been selected, choose your conversion options, click the "Convert" button, and then select an output folder. A progress bar will appear with the conversion progress. You may cancel the conversion by clicking the "Cancel" button.
Note: You may drag a different image, folder, or multiple files onto the Snap Converter window to perform a new single or batch image conversion.
A note about batch conversion behavior: When specifying a folder for batch conversion, Snap Converter only attempts to convert files that have a matching filename extension (e.g., ".jpg," ".png," etc.). This behavior differs from when dragging and dropping single or multiple files. In the case of single or multiple files, Snap Converter attempts to open each file individually irrespective of the file's extension. For example, an extensionless PNG file will still get converted. This folder batch conversion behavior exists for performance reasons. (Consider trying to open every file in every subfolder when the "Include subfolders" option is checked.)
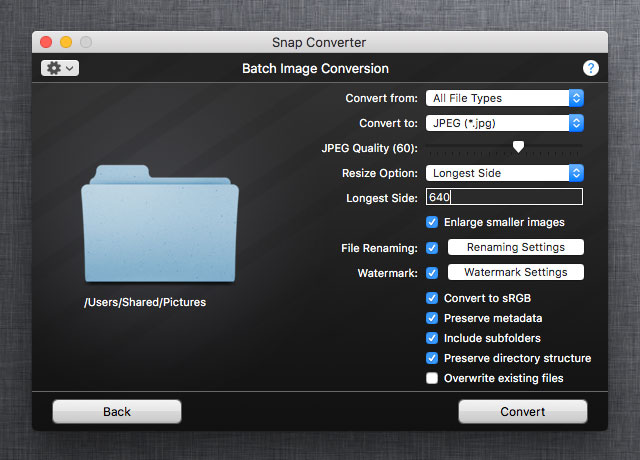 Batch Image Conversion options
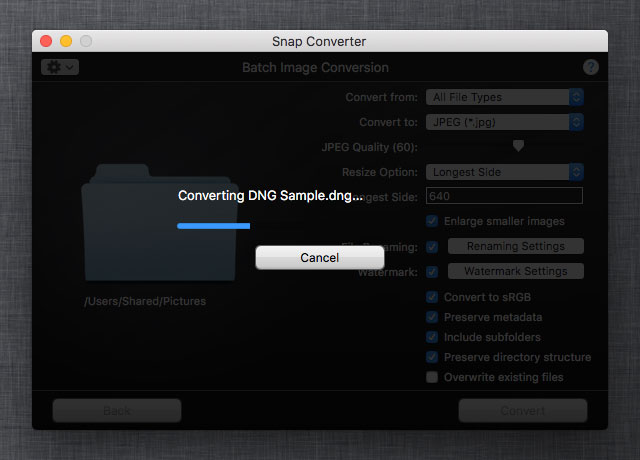 Batch Image Conversion progress
General Options
| Convert from | Files in the folder with a matching extension will be converted. For example, "JPEG (*.jpg, *.jpeg, *.jpe)" will convert all files with the ".jpg," ".jpeg," or ".jpe" file extensions. Select the "All File Types" option to convert from all supported file types. NOTE: Batch conversions do not include images in sub-folders. |
| Convert to | The image type to convert to. If the "Copy files (don't convert)" option is selected, the files will be copied to the output directory and not converted. |
| JPEG Quality | The quality of the output JPEG images. The higher the quality, the higher the file size. If you specify 100 as the quality, Snap Converter will use lossless compression. This option only displays when the "Convert to" option is set to JPEG. |
| Optimize File Size | Whether or not to use file size optimization for the output PNG image. This option can significantly reduce the output PNG image size without losing image quality. This option only displays when the "Convert to" option is set to PNG. Optimization will take longer to convert. NOTE: This process uses pngcrush technology and will strip color profile information. Therefore, if you want to retain color profiles, do not use this option. |
| Preserve Metadata | Whether to preserve any image metadata (Exif, ExifAux, TIFF, GIF, JFIF, DNG, etc.). This option is only available for JPG and TIFF output. |
| Include subfolders | Should the batch conversion grab all files in subfolders as well? |
| Preserve directory structure | Should the output directory recreate the directory structure of the input folder? This option is only enabled when "Include subfolders" is checked. If this option is not checked, all files will just be dumped into the same output folder. |
| Overwrite existing files | Should existing files in the output directory with the same filename be overwritten? |
Resize Options
(values are always in pixels unless specified otherwise)
| None | No width or height adjustment (the converted image will have its original dimensions). |
| Percentage | The image width and height are scaled by the percentage specified by the sliding bar. Decimal points are rounded to the nearest integer. |
| Longest Side | Maintains the image aspect ratio but makes sure that the image width and height are not longer than the value specified in the Longest Side field. Images are never enlarged unless the Enlarge smaller images option is checked. If the Longest Side value is blank, the image is not resized. |
| Absolute Size | Resizes the image to whatever width and height are specified. If you leave width blank, the original image's width is used (likewise for height). |
| Fixed Width or Height | Sets either the width or height to the specified length and rescales the other dimension by the image's aspect ratio. Images may be shrunk or expanded depending on the value entered. The image is not resized if the value is left blank. |
| Max Width and Height | Ensures that the resulting width is not larger than Max Width and the resulting height is not larger than Max Height. The image aspect ratio is maintained. If Max Width is left blank, the image's original width is used (same for Max Height). |
3. Watermark Options
To apply a watermark, choose "Enable Text Watermark" or "Enable Image Watermark," select your options, and then choose the "Save & Close" button. You can choose the "Cancel" button to discard your current selections. Don't be afraid to try a few conversions while tweaking your watermark settings. You can experiment with many different options until you find the right settings for your watermark.
Text Watermark Options
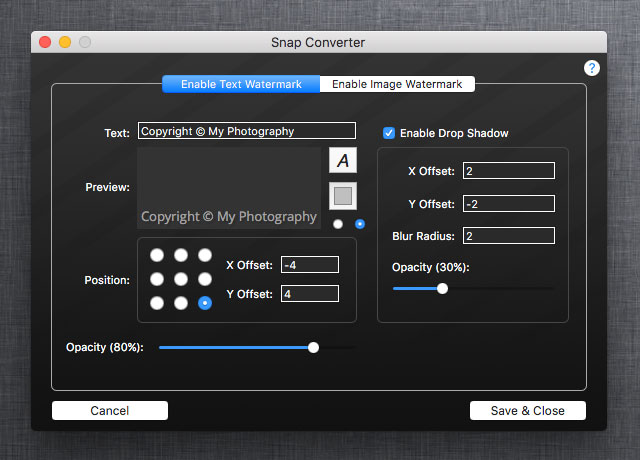
| Text | The watermark text to be overlaid on the image. |
| Font | The font to be used for the watermark text. You can change the font by clicking the font and color options to the right of the font preview. |
| Position | The location to snap the watermark from one of nine places (Upper-Right, Upper-Center, Upper-Left, Middle-Left, etc.). |
| X Offset (Position) | The number of pixels to the right by which to offset the watermark from the Position. You can specify negative numbers to go to the left. |
| Y Offset (Position) | The number of pixels by which to offset the watermark vertically from the Position. You can specify negative numbers to go down instead of up. |
| Opacity | The transparency of the watermark text, where 1 is almost invisible and 100 is fully opaque. |
| Enable Drop Shadow | Whether to enable the drop shadow options on the text. |
| X Offset (Drop Shadow) | The number of pixels to the right by which to offset the drop shadow from the watermark text. You can specify negative numbers to go to the left. |
| Y Offset (Drop Shadow) | The number of pixels by which to offset the drop shadow vertically from the watermark text. You can specify negative numbers to go down instead of up. |
| Blur Radius (Drop Shadow) | How much to disperse the drop shadow. |
| Opacity (Drop Shadow) | The transparency of the drop shadow, where 1 is almost invisible and 100 is fully opaque. |
Image Watermark Options
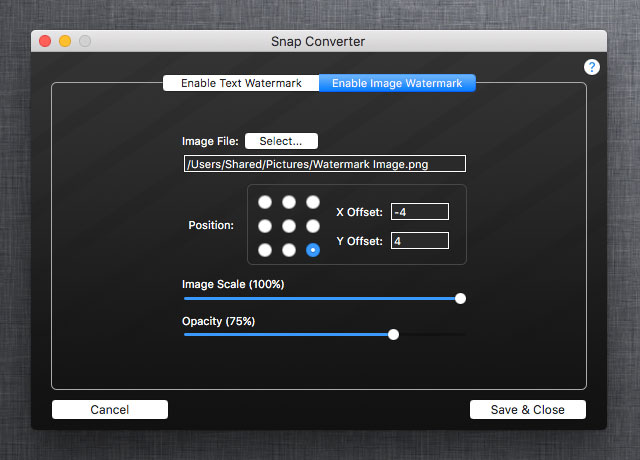
| Image | The watermark image to overlay on the target converted image. |
| Position | The location to snap the watermark from one of nine places (Upper-Right, Upper-Center, Upper-Left, Middle-Left, etc.). |
| X Offset (Position) | The number of pixels to the right by which to offset the watermark from the Position. You can specify negative numbers to go to the left. |
| Y Offset (Position) | The number of pixels by which to offset the watermark vertically from the Position. You can specify negative numbers to go down instead of up. |
| Image Scale | The percentage of the original image size to use. To use the full-size image, choose 100%. |
| Opacity | The transparency of the watermark image, where 1 is almost invisible and 100 is fully opaque. |
4. File Renaming Options
File renaming options allow you to change filenames when the images are converted. Renaming options are only provided in batch mode. You can choose from the counter scheme or the add/replace scheme. Once you've selected your options, choose Save & Close. You can click the Cancel button to discard the changes.
Filename Counter Options
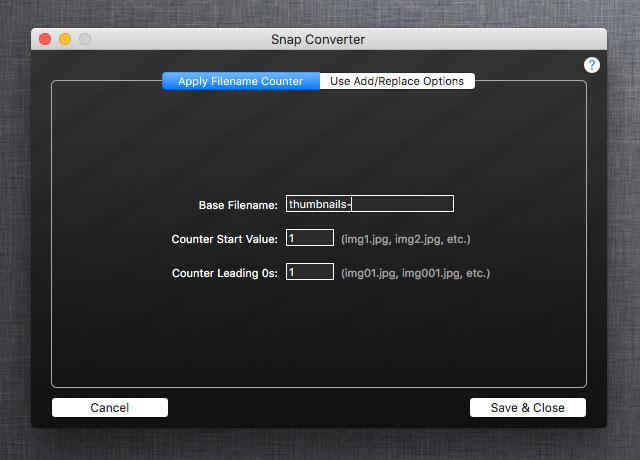
| Base Filename | The filename prefix that precedes the counter value. |
| Counter Start Value | The value to start the incrementing counter (e.g., if you choose 1, then the images will be labeled img1.jpg, img2.jpg, etc.) |
| Counter Leading 0s | The number of leading zeros to apply to the counter value. For example, if you choose 2 zeros and start with a counter value of 1, you will get img001.jpg, img002.jpg, ..., img010.jpg, img011.jpg, ..., img100.jpg, img101.jpg, etc. This option is useful for making sure that the output images are ordered naturally by filename. |
Use Add/Replace Options
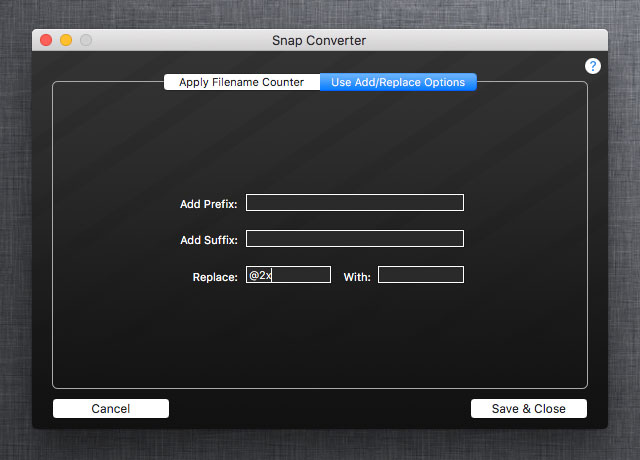
| Add Prefix | A filename prefix to add to the existing filename. |
| Add Suffix | A filename suffix to add to the existing filename, before the file extension. |
| Replace | A string to replace in the exising filename. |
| With | The string to replace the "Replace" value with. If you leave this blank and fill the Replace value, then the matching string is removed from the converted image's filename. |
